This quick tip shows you the steps to create a simple Button or
ImageButton control in your Android application. First, you learn how to
add button controls to your layout files. Next, you learn how to handle
button clicks from the user in two different ways. Finally, we discuss
some of the other features available to button controls in Android.
You can follow along with our project: BasicButtons, which is available as an open source project.
 ), Pause (
 ) and Stop (
 ).
).
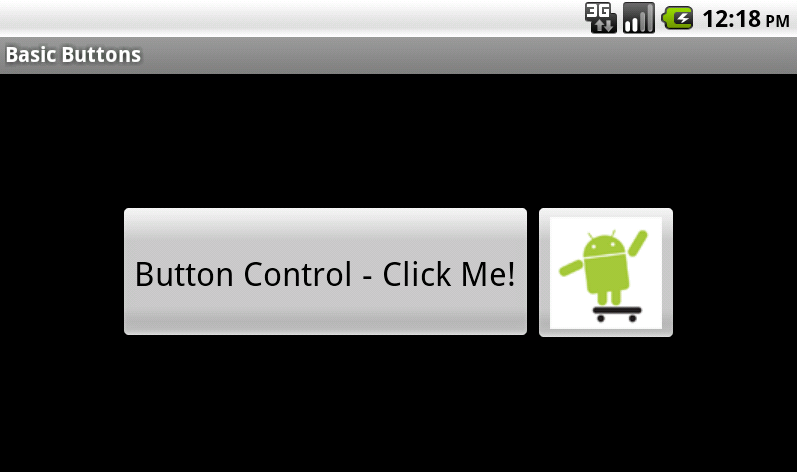
Here is an example of a screen with both a Button control (left) and an ImageButton control (right).
 The
Android SDK also includes several other lesser-known button-like
controls derived from these two basic button types, including
CompoundButton, RadioButton, ToggleButton, and ZoomButton. For more
information on these controls, see the Android documentation. You can
also create custom controls yourself by deriving from the appropriate
class and implementing the control’s behavior.
The
Android SDK also includes several other lesser-known button-like
controls derived from these two basic button types, including
CompoundButton, RadioButton, ToggleButton, and ZoomButton. For more
information on these controls, see the Android documentation. You can
also create custom controls yourself by deriving from the appropriate
class and implementing the control’s behavior.
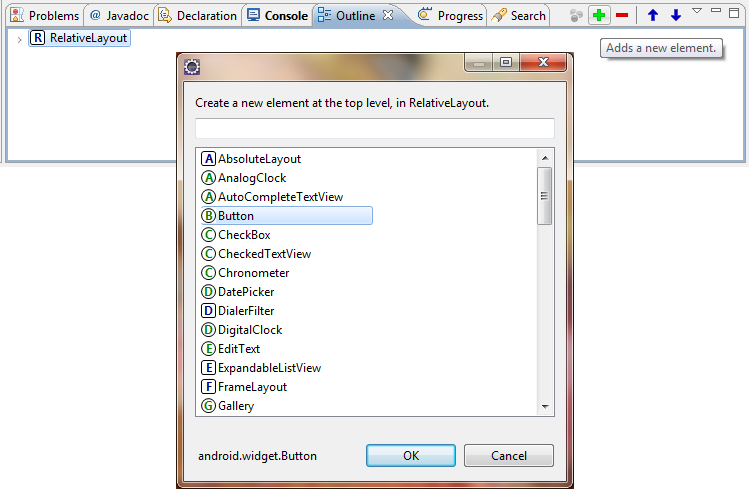
To add a Button control to a layout resource file, open the /res/layout/main.xml layout file that is part of your Android project. Click on the LinearLayout (or parent layout control, such as a RelativeLayout or FrameLayout) that you wish to add the Button control to. In Eclipse, you can click on the parent layout within the Outline tab, and then add a new control using the green button with the plus sign. Choose the control you want to add—in this case, a Button control.
 To
configure how the Button control looks, adjust the control’s properties
by selecting the control (either in the Outline tab or the Preview
window) and changing its properties in the Properties Tab. Specific
properties you will want to be aware of:
To
configure how the Button control looks, adjust the control’s properties
by selecting the control (either in the Outline tab or the Preview
window) and changing its properties in the Properties Tab. Specific
properties you will want to be aware of:
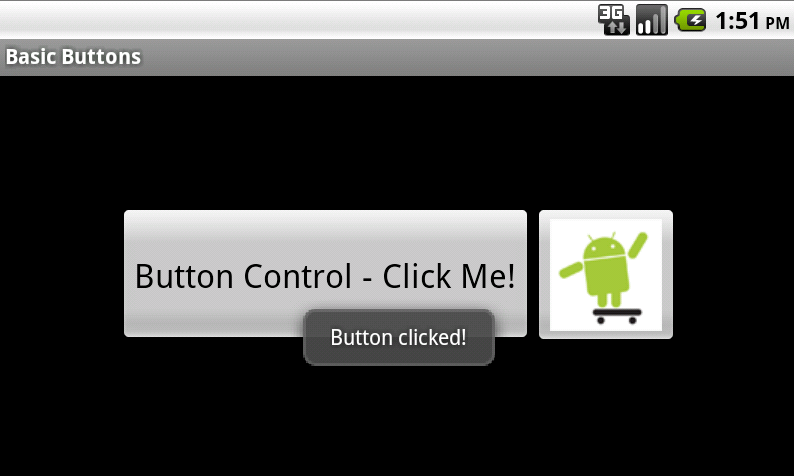
Let’s start with the easy way. Button and ImageButton controls have a property called onClick (shown as “On Click” in the properties pane).. You set the name of the method that will handle the click with this property, and then implement that method within your Activity. For example, you could set the property of your Button control to onMyButtonClick. In XML, this property would appear as:
Then,
in your Activity class, you need to implement this method. It should be
a public void method with a single parameter, a View object. For
example, the following button click implementation generates a Toast
message on the screen when the Button control is clicked:
When
you click on the Button control, the onMyButtonClick() method is
called, displaying the Toast message on the screen. The details of what
your Button control does is up to you. Here’s what the Toast message
would look like when you pressed the Button control:
To use this method, you must update your Activity class to register for control clicks. This is typically done within the onCreate() method of your Activity. Retrieve the control using the findViewById() method and then use its the setOnClickListener() method to define the behavior of the control when clicked. You will need to implement the onClick() method of the interface yourself. For example, the following code (placed in the onCreate() method of the Activity) registers a click handler for our ImageButton control.
Similarly, you can use this technique to implement long click handling using the control’s setOnLongClickListener() method.
Step 1: Create an Android Application
Begin by creating an Android project. Implement your Android application as normal. Once you have a project set up and the application running, decide under what screen you want to add Button controls to. Perhaps you’ve simply created a new Android project with its default Activity and layout (main.xml). This will work for this tutorial. Once you have gotten your Android project set up, you are ready to proceed with this quick tip.You can follow along with our project: BasicButtons, which is available as an open source project.
Step 2: Working with Button Controls
The Android SDK includes two simple button controls for use within your layouts: Button (android.widget.Button) and ImageButton (android.widget.ImageButton). These controls function in a similar way so we can discuss them pretty much interchangeably. The difference between the controls is mostly visual; the Button control has a text label, whereas the ImageButton uses an image drawable resource instead. A good example of Button usage would be a simple button with a text label “Save”. A good example of ImageButton usage would a set of musically-inspired buttons with the symbols for Play (), Pause () and Stop ( ).Here is an example of a screen with both a Button control (left) and an ImageButton control (right).
Step 3: Adding a Button Control to a Layout
Button controls are usually included as part of your Activity’s layout resource file. For example, to add a Button control to the main.xml layout resource associated with your application, you must edit the layout file. You can do this within Eclipse using the Layout Resource designer, or by editing the XML directly. Controls such as buttons can also be created programmatically and added to your screen at runtime. Simply create the appropriate control from its class and add it to your layout within your Activity.To add a Button control to a layout resource file, open the /res/layout/main.xml layout file that is part of your Android project. Click on the LinearLayout (or parent layout control, such as a RelativeLayout or FrameLayout) that you wish to add the Button control to. In Eclipse, you can click on the parent layout within the Outline tab, and then add a new control using the green button with the plus sign. Choose the control you want to add—in this case, a Button control.
- Give the Button or ImageButton control a unique name using the id property.
- Set the text displayed on the Button control using the text property; set the image displayed on the ImageButton control using the src property.
- Set the layout height and layout width properties of the control to wrap_content.
- Set any other properties you desire to adjust the control’s appearance. For example, adjust the font of a Button using the Text color, text size, and text style properties.
- <?xml version="1.0" encoding="utf-8"?>
- <RelativeLayout
- xmlns:android="http://schemas.android.com/apk/res/android"
- android:layout_width="fill_parent"
- android:layout_height="fill_parent"
- android:gravity="center">
- <Button
- android:id="@+id/Button01"
- android:layout_width="wrap_content"
- android:layout_height="wrap_content"
- android:text="@string/hello"
- android:minHeight="92dp"
- android:textSize="22dp"
- android:onClick="onMyButtonClick"></Button>
- <ImageButton
- android:layout_width="wrap_content"
- android:layout_height="wrap_content"
- android:src="@drawable/skater"
- android:id="@+id/ImageButton01"
- android:layout_toRightOf="@+id/Button01"></ImageButton>
- </RelativeLayout>
Step 4: Handling Clicks – The Easy Way
For now, if you launch this application, the button controls are displayed, but nothing happens if you click on them. Now it’s time to handle clicks on the controls. There are several ways to do this.Let’s start with the easy way. Button and ImageButton controls have a property called onClick (shown as “On Click” in the properties pane).. You set the name of the method that will handle the click with this property, and then implement that method within your Activity. For example, you could set the property of your Button control to onMyButtonClick. In XML, this property would appear as:
- android:onClick="onMyButtonClick"
- public void onMyButtonClick(View view)
- {
- Toast.makeText(this, "Button clicked!", Toast.LENGTH_SHORT).show();
- }
Step 5: Handling Clicks – Implementing an OnClickListener
The other way to implement your click handling is to register a new View.OnClickListener with your button control using the setOnClickListener() method. Instead of setting the On Click property of your button control in your layout resource to a method you must implement, you do this programmatically within your Activity. While this might seem like a lot of extra code to write, it’s important to at least understand it, as clicks are not the only event worth handling on certain controls. The programmatic method we are about to show you applies to other events such as long clicks.To use this method, you must update your Activity class to register for control clicks. This is typically done within the onCreate() method of your Activity. Retrieve the control using the findViewById() method and then use its the setOnClickListener() method to define the behavior of the control when clicked. You will need to implement the onClick() method of the interface yourself. For example, the following code (placed in the onCreate() method of the Activity) registers a click handler for our ImageButton control.
- ImageButton myImageButton = (ImageButton) findViewById(R.id.ImageButton01);
- myImageButton.setOnClickListener(new View.OnClickListener() {
- public void onClick(View v) {
- Toast.makeText(BasicButtonActivity.this, "ImageButton clicked!", Toast.LENGTH_SHORT).show();
- }
- });

