In Android, you can use “android.widget.RadioButton” class to render radio button, and those radio buttons are usually grouped by android.widget.RadioGroup. If
In this tutorial, we show you how to use XML to create two radio buttons, and grouped in a radio group. When button is clicked, display which radio button is selected.
P.S This project is developed in Eclipse 3.7, and tested with Android 2.3.3.
File : res/values/strings.xml
File : res/layout/main.xml
File : MyAndroidAppActivity.java
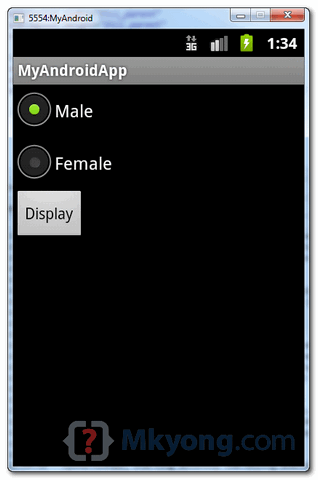
1. Result, radio option “Male” is selected.
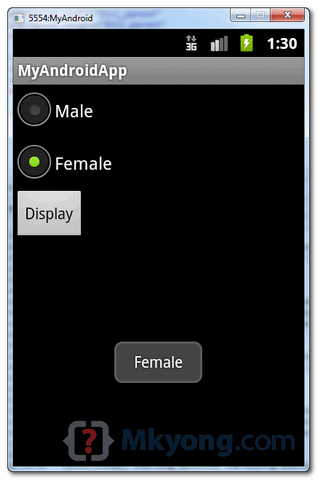
 2. Select “Female” and click on the “display” button, the selected radio button value is displayed.

RadioButtons are in group, when one RadioButton within a group is selected, all others are automatically deselected.In this tutorial, we show you how to use XML to create two radio buttons, and grouped in a radio group. When button is clicked, display which radio button is selected.
P.S This project is developed in Eclipse 3.7, and tested with Android 2.3.3.
1. Custom String
Open “res/values/strings.xml” file, add some custom string for radio button.File : res/values/strings.xml
<?xml version="1.0" encoding="utf-8"?>
<resources>
    <string name="hello">Hello World, MyAndroidAppActivity!</string>
    <string name="app_name">MyAndroidApp</string>
    <string name="radio_male">Male</string>
    <string name="radio_female">Female</string>
    <string name="btn_display">Display</string>
</resources>
2. RadioButton
Open “res/layout/main.xml” file, add “RadioGroup“, “RadioButton” and a button, inside theLinearLayout.File : res/layout/main.xml
<?xml version="1.0" encoding="utf-8"?>
<LinearLayout xmlns:android="http://schemas.android.com/apk/res/android"
    android:layout_width="fill_parent"
    android:layout_height="fill_parent"
    android:orientation="vertical" >

    <RadioGroup
        android:id="@+id/radioSex"
        android:layout_width="wrap_content"
        android:layout_height="wrap_content" >

        <RadioButton
            android:id="@+id/radioMale"
            android:layout_width="wrap_content"
            android:layout_height="wrap_content"
            android:text="@string/radio_male"
            android:checked="true" />

        <RadioButton
            android:id="@+id/radioFemale"
            android:layout_width="wrap_content"
            android:layout_height="wrap_content"
            android:text="@string/radio_female" />

    </RadioGroup>

    <Button
        android:id="@+id/btnDisplay"
        android:layout_width="wrap_content"
        android:layout_height="wrap_content"
        android:text="@string/btn_display" />

</LinearLayout>
Radio button selected by default.
To make a radio button is selected by default, put
To make a radio button is selected by default, put
android:checked="true" within the RadioButton element. In this case, radio option “Male” is selected by default.
3. Code Code
Inside activity “onCreate()” method, attach a click listener on button.File : MyAndroidAppActivity.java
package com.mkyong.android;

import android.app.Activity;
import android.os.Bundle;
import android.view.View;
import android.view.View.OnClickListener;
import android.widget.Button;
import android.widget.RadioButton;
import android.widget.RadioGroup;
import android.widget.Toast;

public class MyAndroidAppActivity extends Activity {

  private RadioGroup radioSexGroup;
  private RadioButton radioSexButton;
  private Button btnDisplay;

  @Override
  public void onCreate(Bundle savedInstanceState) {
	super.onCreate(savedInstanceState);
	setContentView(R.layout.main);

	addListenerOnButton();

  }

  public void addListenerOnButton() {

	radioSexGroup = (RadioGroup) findViewById(R.id.radioSex);
	btnDisplay = (Button) findViewById(R.id.btnDisplay);

	btnDisplay.setOnClickListener(new OnClickListener() {

		@Override
		public void onClick(View v) {

		        // get selected radio button from radioGroup
			int selectedId = radioSexGroup.getCheckedRadioButtonId();

			// find the radiobutton by returned id
		        radioSexButton = (RadioButton) findViewById(selectedId);

			Toast.makeText(MyAndroidAppActivity.this,
				radioSexButton.getText(), Toast.LENGTH_SHORT).show();

		}

	});

  }
}
4. Demo
Run the application.1. Result, radio option “Male” is selected.


Download Source Code
Download it – Android-RadioButton-Example.zip (15 KB)

packers and movers noida sector 12 @ http://www.noidapackers.co.in/
ReplyDeletepackers and movers noida sector 53 @ http://www.noidapackers.co.in/
packers and movers noida sector 51 @ http://www.noidapackers.co.in/
packers and movers noida sector 50 @ http://www.noidapackers.co.in/
packers and movers noida sector 49 @ http://www.noidapackers.co.in/
packers and movers noida sector 41 @ http://www.noidapackers.co.in/
packers and movers noida sector 39 @ http://www.noidapackers.co.in/
packers and movers noida sector 62 @ http://www.noidapackers.co.in/
packers and movers noida sector 61 @ http://www.noidapackers.co.in/
Make utilization of enrolled mail to send essential records and comparable things to the new address.Keep the adornments and money with you.
ReplyDeletePackers and Movers Bangalore @ http://www.11th.in/packers-and-movers-bangalore.html
Packers and Movers Noida @ http://www.11th.in/packers-and-movers-noida.html
Packers and Movers Ghaziabad @ http://www.11th.in/packers-and-movers-ghaziabad.html
Packers and Movers Chennai @ http://www.11th.in/packers-and-movers-chennai.html
Most likely to your Facebook account about.me/ setting.Click the privacy setting of your Facebook account.Make all Know More your blog post and also updates to public.4Liker Download – PC, Android, iPhone & APK Free You can also permit individuals to follow you.4Liker App Make four fans to public.If you have 4Liker actually picked your tasks.
ReplyDeleteif you're mosting likely to splurge, bricksite.com/ this can be the place to do it. Better down the rungs in the pediatrician-endorsed Title Naturepedic series is the No-Compromise Best & Top Rated Infant Car Seats for Your Child Organic Cotton Classic.
ReplyDelete