In Android, you can use “android.widget.ImageView”
class to display an image file. Image file is easy to use but hard to
master, because of the various screen and dpi in Android devices.
P.S This project is developed in Eclipse 3.7, and tested with Android 2.3.3.
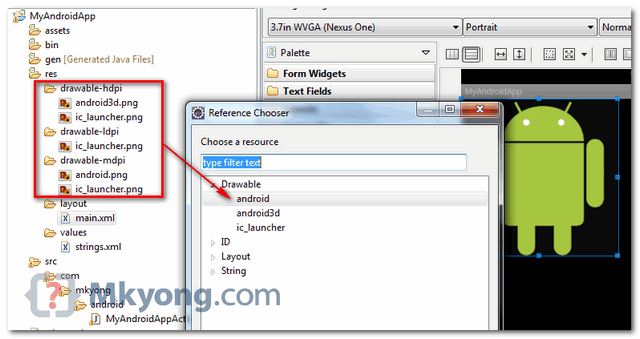
See figure below, no matter which folder you put, Android will find your image automatically. In this case, both “android.png” and “android3d.png” images are used for demonstration.

File : res/layout/main.xml
File : MyAndroidAppActivity.java
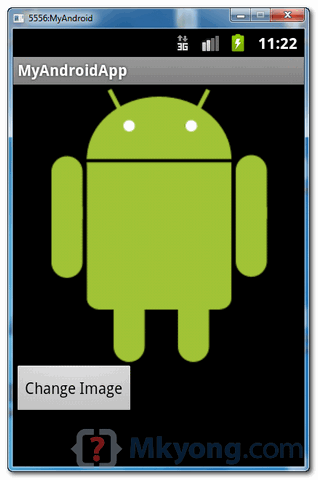
1. Result, “android.png” is displayed.
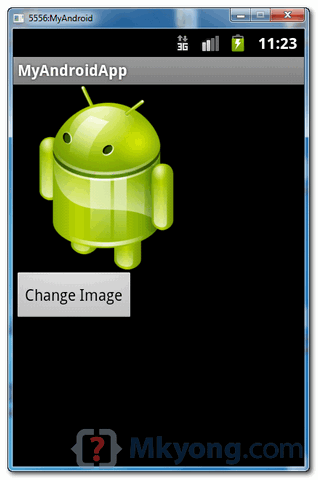
 2. Click on the button, image will changed to “android3d.png”.

Note
Please refer to this official Android’s “Drawable Resource” and “Screen Support” article for better understand of how image works in Android.
In this tutorial, we didn’t go in deep about dpi and various screen issue, we just use Please refer to this official Android’s “Drawable Resource” and “Screen Support” article for better understand of how image works in Android.
ImageView to display a “png” image, when user click on a button, it will change to another “png” image.P.S This project is developed in Eclipse 3.7, and tested with Android 2.3.3.
1. Add Image to Resources
Put your images into folder “res/drawable-ldpi“, “res/drawable-mdpi” or “res/drawable-hdpi“. See figure below, no matter which folder you put, Android will find your image automatically. In this case, both “android.png” and “android3d.png” images are used for demonstration.

Note
Again, read official Android’s “Drawable Resource” and “Screen Support” article to understand what is dpi and resources in Android.
Again, read official Android’s “Drawable Resource” and “Screen Support” article to understand what is dpi and resources in Android.
2. Add ImageView
Open “res/layout/main.xml” file, just add anImageView and Button for demonstration. By default, imageView1 will display “android.png”.File : res/layout/main.xml
<?xml version="1.0" encoding="utf-8"?>
<LinearLayout xmlns:android="http://schemas.android.com/apk/res/android"
    android:layout_width="fill_parent"
    android:layout_height="fill_parent"
    android:orientation="vertical" >

    <ImageView
        android:id="@+id/imageView1"
        android:layout_width="wrap_content"
        android:layout_height="wrap_content"
        android:src="@drawable/android" />

    <Button
        android:id="@+id/btnChangeImage"
        android:layout_width="wrap_content"
        android:layout_height="wrap_content"
        android:text="Change Image" />

</LinearLayout>
3. Code Code
Simple, when button is clicked, change it to “android3d.png”.File : MyAndroidAppActivity.java
package com.mkyong.android;

import android.app.Activity;
import android.os.Bundle;
import android.widget.Button;
import android.widget.ImageView;
import android.view.View;
import android.view.View.OnClickListener;

public class MyAndroidAppActivity extends Activity {

	Button button;
	ImageView image;

	@Override
	public void onCreate(Bundle savedInstanceState) {
		super.onCreate(savedInstanceState);
		setContentView(R.layout.main);

		addListenerOnButton();

	}

	public void addListenerOnButton() {

		image = (ImageView) findViewById(R.id.imageView1);

		button = (Button) findViewById(R.id.btnChangeImage);
		button.setOnClickListener(new OnClickListener() {

			@Override
			public void onClick(View arg0) {
				image.setImageResource(R.drawable.android3d);
			}

		});

	}

}
4. Demo
Run the application.1. Result, “android.png” is displayed.


Download Source Code
Download it – Android-ImageView-Example.zip (57 KB)

nike shox for men
ReplyDeletenike foamposite
nike vapormax
supreme
yeezy shoes
off white clothing
supreme
ferragamo belt
balenciaga shoes
adidas zx flux
n4r10r7q11 c3d36o0m98 t9o35b1m13 v2d25a2d24 o0r57y0m02 x8d86e6w60
ReplyDelete