Showing posts with label Android UI Controls. Show all posts

Tuesday 2 July 2013

Android password field example

// siddhu vydyabhushana // 1 comment
In Android, you can use “android.widget.EditText“, with inputType="textPassword" to render a password component.
In this tutorial, we show you how to use XML to create a password field, label field and a normal button. When you click on the button, the password value will be displayed as a floating message (toast message).
P.S This project is developed in Eclipse 3.7, and tested with Android 2.3.3.

1. Custom String

Open “res/values/strings.xml” file, add some custom string for demonstration.
File : res/values/strings.xml
<?xml version="1.0" encoding="utf-8"?>
<resources>
    <string name="app_name">MyAndroidApp</string>
    <string name="lblPassword">Enter Your Password :</string>
    <string name="btn_submit">Submit</string>
</resources>

2. Password

Open “res/layout/main.xml” file, add a password component, EditText + inputType="textPassword".
File : res/layout/main.xml
<?xml version="1.0" encoding="utf-8"?>
<LinearLayout xmlns:android="http://schemas.android.com/apk/res/android"
    android:layout_width="fill_parent"
    android:layout_height="fill_parent"
    android:orientation="vertical" >
 
    <TextView
        android:id="@+id/lblPassword"
        android:layout_width="wrap_content"
        android:layout_height="wrap_content"
        android:text="@string/lblPassword"
        android:textAppearance="?android:attr/textAppearanceLarge" />
 
    <EditText
        android:id="@+id/txtPassword"
        android:layout_width="match_parent"
        android:layout_height="wrap_content"
        android:inputType="textPassword" >
 
        <requestFocus />
    </EditText>
 
    <Button
        android:id="@+id/btnSubmit"
        android:layout_width="wrap_content"
        android:layout_height="wrap_content"
        android:text="@string/btn_submit" />
 
</LinearLayout>

3. Code Code

Inside activity “onCreate()” method, attach a click listener on button, to display the password value.
File : MyAndroidAppActivity.java
package com.mkyong.android;
 
import android.app.Activity;
import android.os.Bundle;
import android.view.View;
import android.view.View.OnClickListener;
import android.widget.Button;
import android.widget.EditText;
import android.widget.Toast;
 
public class MyAndroidAppActivity extends Activity {
 
  private EditText password;
  private Button btnSubmit;
 
  @Override
  public void onCreate(Bundle savedInstanceState) {
	super.onCreate(savedInstanceState);
	setContentView(R.layout.main);
 
	addListenerOnButton();
 
  }
 
  public void addListenerOnButton() {
 
	password = (EditText) findViewById(R.id.txtPassword);	
	btnSubmit = (Button) findViewById(R.id.btnSubmit);
 
	btnSubmit.setOnClickListener(new OnClickListener() {
 
		@Override
		public void onClick(View v) {
 
		  Toast.makeText(MyAndroidAppActivity.this, password.getText(),
			Toast.LENGTH_SHORT).show();
 
		}
 
	});
 
  }
}

4. Demo

Run the application.
1. Result, password field is displayed.
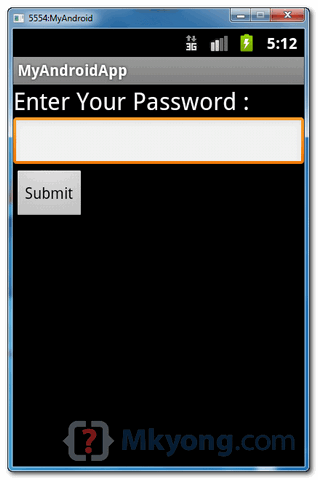
android password demo1
2. Type password “mkyong123″ and click on the submit button.
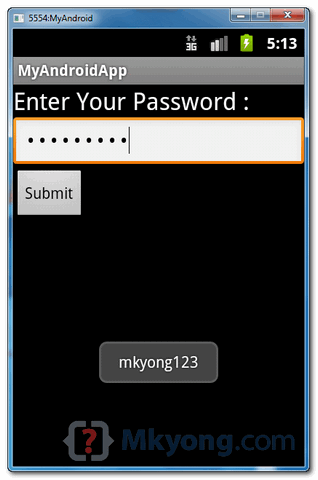
android password demo2

Download Source Code

Download it – Android-Password-Example.zip (15 KB)
Read More

Android ListView example

// siddhu vydyabhushana // 5 comments
In Android, ListView let you arranges components in a vertical scrollable list.
In this tutorial, we will show you 2 ListView examples :
  1. Normal way to display components in ListView.
  2. Custom array adapter to customize the item display in ListView.
P.S This project is developed in Eclipse 3.7, and tested with Android 2.3.3.

1. Normal ListView example

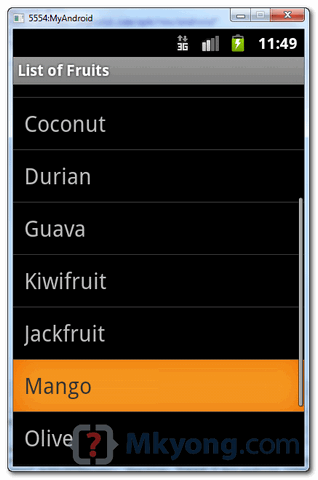
In this example, we show you how to display a list of fruit name via ListView, it should be easy and self-explanatory.
1.1 Android Layout file
File : res/layout/list_fruit.xml
<?xml version="1.0" encoding="utf-8"?>
<TextView xmlns:android="http://schemas.android.com/apk/res/android"
    android:layout_width="fill_parent"
    android:layout_height="fill_parent"
    android:padding="10dp"
    android:textSize="20sp" >
</TextView>
1.2 ListView
package com.mkyong.android;
 
import android.app.ListActivity;
import android.os.Bundle;
import android.view.View;
import android.widget.AdapterView;
import android.widget.ArrayAdapter;
import android.widget.ListView;
import android.widget.TextView;
import android.widget.Toast;
import android.widget.AdapterView.OnItemClickListener;
 
public class ListFruitActivity extends ListActivity {
 
	static final String[] FRUITS = new String[] { "Apple", "Avocado", "Banana",
			"Blueberry", "Coconut", "Durian", "Guava", "Kiwifruit",
			"Jackfruit", "Mango", "Olive", "Pear", "Sugar-apple" };
 
	@Override
	public void onCreate(Bundle savedInstanceState) {
		super.onCreate(savedInstanceState);
 
		// no more this
		// setContentView(R.layout.list_fruit);
 
		setListAdapter(new ArrayAdapter<String>(this, R.layout.list_fruit,FRUITS));
 
		ListView listView = getListView();
		listView.setTextFilterEnabled(true);
 
		listView.setOnItemClickListener(new OnItemClickListener() {
			public void onItemClick(AdapterView<?> parent, View view,
					int position, long id) {
			    // When clicked, show a toast with the TextView text
			    Toast.makeText(getApplicationContext(),
				((TextView) view).getText(), Toast.LENGTH_SHORT).show();
			}
		});
 
	}
 
}
1.3 Demo
android listview example

2. Custom ArrayAdapter example

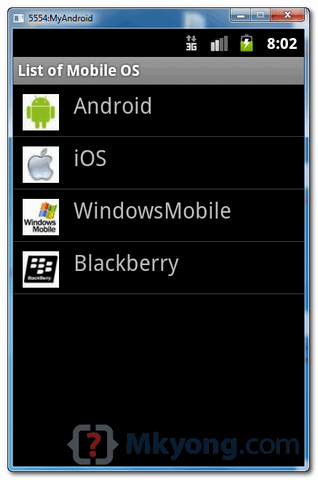
In this example, we show you how to create 4 items in the ListView, and use a custom “ArrayAdapter” to display different images base on the “item name” in the list.
2.1 Images
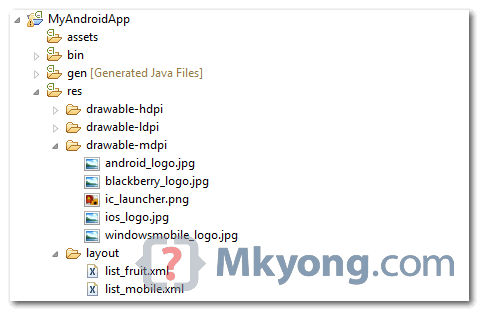
Get 4 images for demonstration.
images in android project
2.2 Android Layout file
File : res/layout/list_mobile.xml
<?xml version="1.0" encoding="utf-8"?>
<LinearLayout xmlns:android="http://schemas.android.com/apk/res/android"
    android:layout_width="wrap_content"
    android:layout_height="wrap_content"
    android:padding="5dp" >
 
    <ImageView
        android:id="@+id/logo"
        android:layout_width="50px"
        android:layout_height="50px"
        android:layout_marginLeft="5px"
        android:layout_marginRight="20px"
        android:layout_marginTop="5px"
        android:src="@drawable/windowsmobile_logo" >
    </ImageView>
 
    <TextView
        android:id="@+id/label"
        android:layout_width="wrap_content"
        android:layout_height="wrap_content"
        android:text="@+id/label"
        android:textSize="30px" >
    </TextView>
 
</LinearLayout>
2.3 Custom ArrayAdapter
Create a class extends ArrayAdapter and customize the item display in the getView() method.
package com.mkyong.android.adaptor;
 
import com.mkyong.android.R;
 
import android.content.Context;
import android.view.LayoutInflater;
import android.view.View;
import android.view.ViewGroup;
import android.widget.ArrayAdapter;
import android.widget.ImageView;
import android.widget.TextView;
 
public class MobileArrayAdapter extends ArrayAdapter<String> {
	private final Context context;
	private final String[] values;
 
	public MobileArrayAdapter(Context context, String[] values) {
		super(context, R.layout.list_mobile, values);
		this.context = context;
		this.values = values;
	}
 
	@Override
	public View getView(int position, View convertView, ViewGroup parent) {
		LayoutInflater inflater = (LayoutInflater) context
			.getSystemService(Context.LAYOUT_INFLATER_SERVICE);
 
		View rowView = inflater.inflate(R.layout.list_mobile, parent, false);
		TextView textView = (TextView) rowView.findViewById(R.id.label);
		ImageView imageView = (ImageView) rowView.findViewById(R.id.logo);
		textView.setText(values[position]);
 
		// Change icon based on name
		String s = values[position];
 
		System.out.println(s);
 
		if (s.equals("WindowsMobile")) {
			imageView.setImageResource(R.drawable.windowsmobile_logo);
		} else if (s.equals("iOS")) {
			imageView.setImageResource(R.drawable.ios_logo);
		} else if (s.equals("Blackberry")) {
			imageView.setImageResource(R.drawable.blackberry_logo);
		} else {
			imageView.setImageResource(R.drawable.android_logo);
		}
 
		return rowView;
	}
}
2.4 ListView
ListView, but use above custom adapter to display the list.
package com.mkyong.android;
 
import com.mkyong.android.adaptor.MobileArrayAdapter;
import android.app.ListActivity;
import android.os.Bundle;
import android.widget.ListView;
import android.widget.Toast;
import android.view.View;
 
public class ListMobileActivity extends ListActivity {
 
	static final String[] MOBILE_OS = 
               new String[] { "Android", "iOS", "WindowsMobile", "Blackberry"};
 
	@Override
	public void onCreate(Bundle savedInstanceState) {
		super.onCreate(savedInstanceState);
 
		setListAdapter(new MobileArrayAdapter(this, MOBILE_OS));
 
	}
 
	@Override
	protected void onListItemClick(ListView l, View v, int position, long id) {
 
		//get selected items
		String selectedValue = (String) getListAdapter().getItem(position);
		Toast.makeText(this, selectedValue, Toast.LENGTH_SHORT).show();
 
	}
 
}
2.5 Demo
android custom array adapter example

Download Source Code

Download both examples – Android-ListView-Example.zip (21 KB)
Read More

Android RelativeLayout example

// siddhu vydyabhushana // 4 comments
In Android, RelativeLayout let you position your component base on the nearby (relative or sibling) component’s position. It’s the most flexible layout, that allow you to position your component to display in anywhere you want (if you know how to “relative” it).
In RelativeLayout, you can use “above, below, left and right” to arrange the component position, for example, display a “button1″ below “button2″, or display “button3″ on right of the “button1″.
Note
The RelativeLayout is very flexible, but hard to master it. Suggest you use Eclipse IDE to drag the component, then view study the Eclipse generated XML layout code to understand how to code “relative” components.
In this tutorial, we show you how to arrange / position button, textview and editbox via “RelativeLayout“.
P.S This project is developed in Eclipse 3.7, and tested with Android 2.3.3.

1. RelativeLayout

Open “res/layout/main.xml” file, add components and position it via “RelativeLayout“. Read below XML code, quite verbose to tell you where to display the component.
File : res/layout/main.xml
<?xml version="1.0" encoding="utf-8"?>
<RelativeLayout xmlns:android="http://schemas.android.com/apk/res/android"
    android:layout_width="fill_parent"
    android:layout_height="fill_parent" >
 
    <Button
        android:id="@+id/btnButton1"
        android:layout_width="wrap_content"
        android:layout_height="wrap_content"
        android:text="Button 1"/>
 
    <Button
        android:id="@+id/btnButton2"
        android:layout_width="wrap_content"
        android:layout_height="wrap_content"
        android:text="Button 2"
        android:layout_toRightOf="@+id/btnButton1"/>
 
     <Button
        android:id="@+id/btnButton3"
        android:layout_width="wrap_content"
        android:layout_height="wrap_content"
        android:text="Button 3"
        android:layout_below="@+id/btnButton1"/>
 
     <TextView
         android:id="@+id/textView1"
         android:layout_width="wrap_content"
         android:layout_height="wrap_content"
         android:layout_below="@+id/btnButton3"
         android:layout_marginTop="94dp"
         android:text="User :"
         android:textAppearance="?android:attr/textAppearanceLarge" />
 
     <EditText
         android:id="@+id/editText1"
         android:layout_width="wrap_content"
         android:layout_height="wrap_content"
         android:layout_alignParentRight="true"
         android:layout_alignTop="@+id/textView1"
         android:layout_toRightOf="@+id/btnButton3" />
 
     <Button
         android:id="@+id/btnSubmit"
         android:layout_width="wrap_content"
         android:layout_height="wrap_content"
         android:layout_alignParentRight="true"
         android:layout_below="@+id/editText1"
         android:text="Submit" />
 
</RelativeLayout>

2. Demo

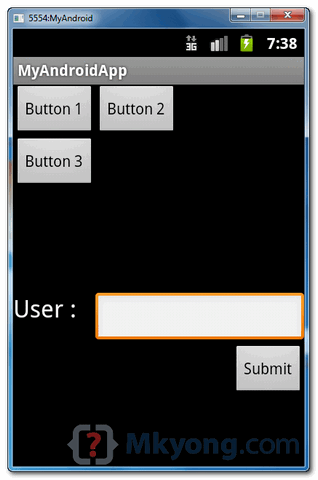
See result, above XML code will generate following output.
android relativelayout demo

Download Source Code

Download it – Android-RelativeLayout-Example.zip (15 KB)
Read More

Android LinearLayout example

// siddhu vydyabhushana // Leave a Comment
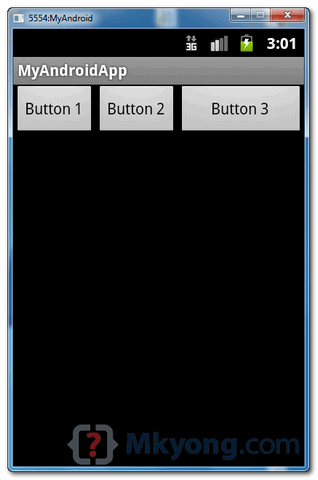
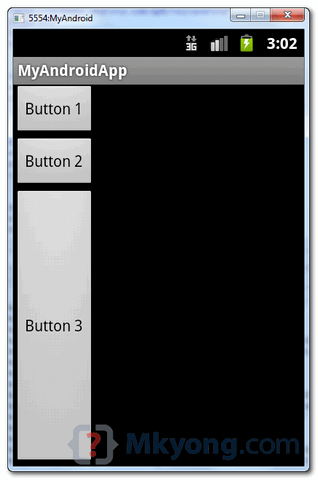
In Android, LinearLayout is a common layout that arranges “component” in vertical or horizontal order, via orientation attribute. In additional, the highest “weight” component will fill up the remaining space in LinearLayout.
In this tutorial, we show you how to use LinearLayout to display 3 buttons in vertical and horizontal order, and also how “weight” works.
P.S This project is developed in Eclipse 3.7, and tested with Android 2.3.3.

1. LinearLayout – Horizontal

Open “res/layout/main.xml” file, add 3 buttons within LinearLayout, with “horizontal” orientation. In this case, the highest weight is “button3″, so it will fill up the remaining space in the layout.
File : res/layout/main.xml
<?xml version="1.0" encoding="utf-8"?>
<LinearLayout xmlns:android="http://schemas.android.com/apk/res/android"
    android:layout_width="fill_parent"
    android:layout_height="fill_parent"
    android:orientation="horizontal" >
 
    <Button
        android:id="@+id/button1"
        android:layout_width="wrap_content"
        android:layout_height="wrap_content"
        android:text="Button 1" />
 
    <Button
        android:id="@+id/button2"
        android:layout_width="wrap_content"
        android:layout_height="wrap_content"
        android:text="Button 2" />
 
    <Button
        android:id="@+id/button3"
        android:layout_width="wrap_content"
        android:layout_height="wrap_content"
        android:text="Button 3" 
        android:layout_weight="1"/>
 
</LinearLayout>
See figure :
android linearlayout demo1

2. LinearLayout – Vertical

Now, change the LinearLayout to “Vertical” orientation.
File : res/layout/main.xml
<?xml version="1.0" encoding="utf-8"?>
<LinearLayout xmlns:android="http://schemas.android.com/apk/res/android"
    android:layout_width="fill_parent"
    android:layout_height="fill_parent"
    android:orientation="vertical" >
 
    <Button
        android:id="@+id/button1"
        android:layout_width="wrap_content"
        android:layout_height="wrap_content"
        android:text="Button 1" />
 
    <Button
        android:id="@+id/button2"
        android:layout_width="wrap_content"
        android:layout_height="wrap_content"
        android:text="Button 2" />
 
    <Button
        android:id="@+id/button3"
        android:layout_width="wrap_content"
        android:layout_height="wrap_content"
        android:text="Button 3" 
        android:layout_weight="1"/>
 
</LinearLayout>
See figure :
android linearlayout demo2

Download Source Code

Download it – Android-LinearLayout-Example.zip (15 KB)
Read More