Showing posts with label Android Applications. Show all posts

Sunday 18 August 2013

Android application for text to speech

// siddhu vydyabhushana // 1 comment
This tutorial will teach you to give your applications a voice with the Android SDK text to speech engine!

The Android text to speech engine still seems to be a pretty underused resource in Android apps. However, implementing it in your own applications is straightforward. There are a few potential issues and choices you need to consider, but for most purposes, the process is not a complex one. In this tutorial we jump around a bit within one Android Activity, but don’t worry, the complete code is listed at the end. The aim is to give you a clear idea of the what’s going on at each processing stage so that you can successfully use the function in any app.
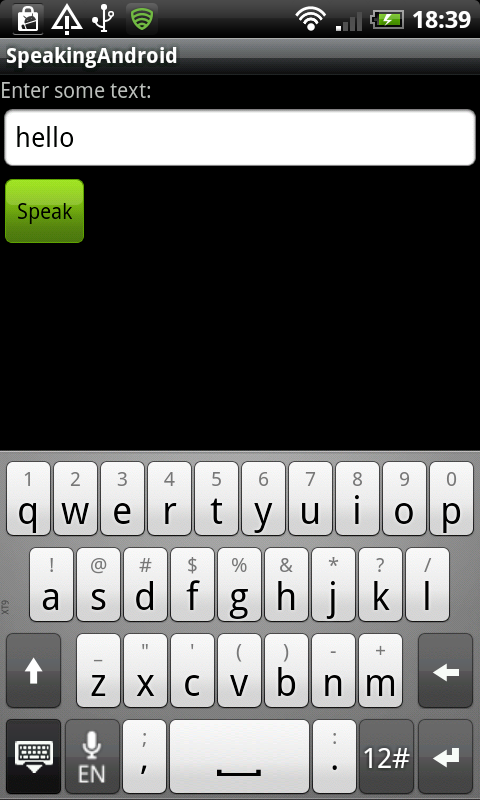
Step 1: Start or Open an Android Project

If you already have an application you want to implement Text To Speech with, open it in your IDE. Otherwise, create a new Android project. You can use the code in this tutorial with any Activity class. For demonstration, we will first create some user interface elements. Again, if you already have your own UI, you can use it instead.

Step 2: Create User Interface Elements

Add some user interface elements to your application, allowing the user to enter text and initiate speech playback using a button. In the XML layout file for your Activity, which will be “main.xml” if you created a new project, add the following markup:
1
2
3
4
5
6
7
8
9
10
11
12
13
14
<TextView android:id="@+id/intro"
    android:layout_width="fill_parent"
    android:layout_height="wrap_content"
    android:text="Enter some text:"
/>
<EditText android:id="@+id/enter"
    android:layout_width="fill_parent"
    android:layout_height="wrap_content"
/>
<Button android:id="@+id/speak"
    android:layout_width="wrap_content"
    android:layout_height="wrap_content"
    android:text="Speak"
/>
Your XML layout files should be in the “res/layout” directory within your 
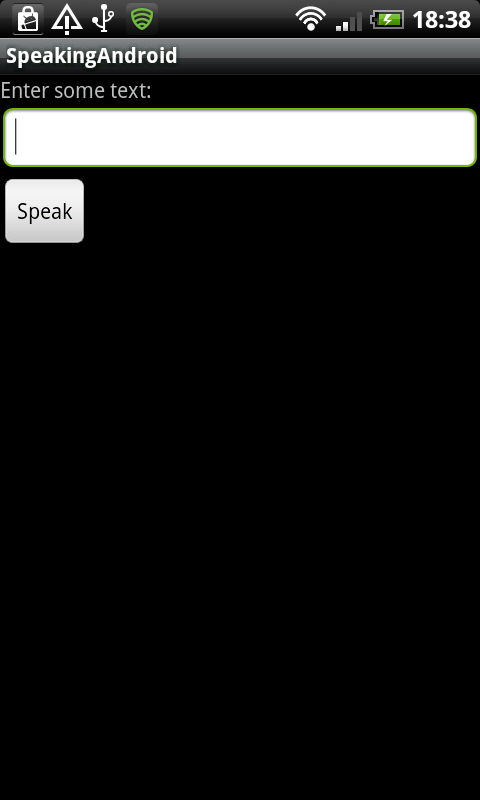
application package. This code adds three user interface elements: a label with some instructional text in it, an editable text-field, and a 
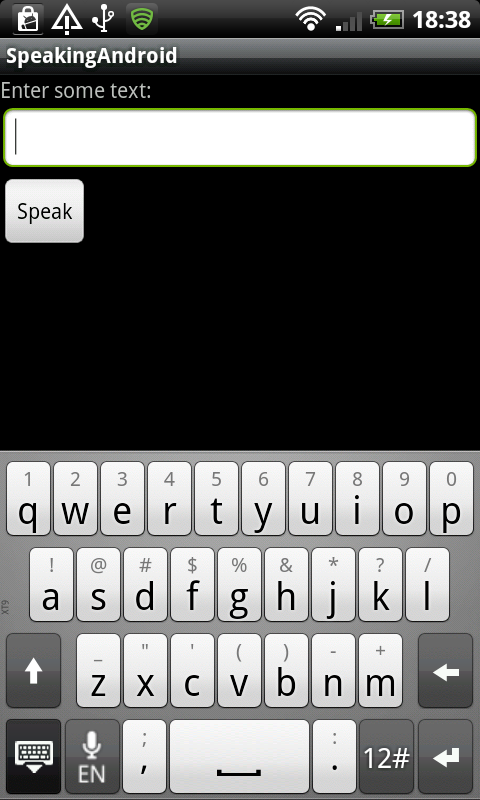
button. The user will be able to enter text into the field, then press the button to hear it spoken. If you are using an existing project, you can of course use the interface elements you already have. If you are using these new elements, you can alter them to suit the design of your own app.
Speech App User Interface

Step 3: Listen For User Events

Open the Java file for the Activity you want to implement TTS in. If you created a new app, open the main class file. In Eclipse, your Activity should automatically have the “onCreate” method within it and should extend “Activity” as part of its declaration. At the top of the class file, add the following import statements so that your app can listen for button clicks:
1
2
3
import android.view.View.OnClickListener;
import android.widget.Button;
import android.view.View;
Alter the class declaration to implement the “OnClickListener” interface, as in the following sample line of code:
1
public class SpeakingAndroid extends Activity implements OnClickListener
Alter the class name to suit your own application details. Your IDE may display warnings because your class has not yet implemented “OnClickListener” correctly – just ignore these for now. In the “onCreate” method, add the following code:
1
2
Button speakButton = (Button)findViewById(R.id.speak);
speakButton.setOnClickListener(this);
If you did not add the button using “speak” as its ID in your XML layout file, alter this code to reflect the correct ID value. This sets your Activity class up to handle user button clicks. Add the following method outline to your class:
1
2
3
public void onClick(View v) {
//handle user clicks here
}
Inside this method you will begin the Text To Speech functionality.

Step 4: Get the Entered Text

When the user clicks the button, your app needs to get any text entered so that you can pass it to the TTS method. Add the following import statement at the top of your class declaration so that your code can refer to the editable text-field:
1
import android.widget.EditText;
Inside your “onClick” method, add the following code:
1
2
EditText enteredText = (EditText)findViewById(R.id.enter);
String words = enteredText.getText().toString();
This code first acquires a reference to the text-field using its ID value, so alter this if you used a different value in your layout XML. Next, the code gets the text from the field and stores it as a string variable. If the user has not entered any text this will be empty. Depending on the logic within your application you may wish to add a conditional test, checking that the string is not null or zero in length, but this is not generally necessary.
Entering Text

Step 5: Create a Speech Method

To keep your Android classes well-organized, it’s advisable to create dedicated methods for processes you may want to use more than once. Add the following method outline to your Activity:
1
2
3
private void speakWords(String speech) {
//implement TTS here
}
This is where your TTS processing will go. Back in the “onClick” listener method, call this new method, passing it the string variable your code copied from the text-field:
1
speakWords(words);
Using a method for the TTS process means that your code can call on it elsewhere if necessary.

Step 6: Implement TTS Within the Class

To utilize the TTS facility, you need to make a few more changes to your class declaration. Add the following import statements for the TTS classes at the top of your file:
1
2
import android.speech.tts.TextToSpeech;
import android.speech.tts.TextToSpeech.OnInitListener;
You also need to implement one more interface, so alter your class declaration outline to add “OnInitListener” as in the following example:
1
public class SpeakingAndroid extends Activity implements OnClickListener, OnInitListener
Remember to use your own class name. Again, your IDE will alert you to the fact that you haven’t yet implemented this interface but don’t worry, you will soon.

Step 7: Check for TTS Data

Your app needs to check that the user has the data necessary for the TTS function before you call its methods. Declare and instantiate the following instance variable at the top of your Activity class declaration, before the “onCreate” method:
1
private int MY_DATA_CHECK_CODE = 0;
Add the following import statement at the top of the class:
1
import android.content.Intent;
In the “onCreate” method, add the following:
1
2
3
Intent checkTTSIntent = new Intent();
checkTTSIntent.setAction(TextToSpeech.Engine.ACTION_CHECK_TTS_DATA);
startActivityForResult(checkTTSIntent, MY_DATA_CHECK_CODE);
This code creates a new Intent purely for the purposes of checking the user data. When the checking process is complete, the code will call the “onActivityResult” method.

Step 8: Create a TTS Instance

Declare an instance variable for your TTS object at the top of the class declaration, also before the “onCreate” method:
1
private TextToSpeech myTTS;
Add the “onActivityResult” to your class as follows:
1
2
3
4
5
6
7
8
9
10
11
12
protected void onActivityResult(int requestCode, int resultCode, Intent data) {
    if (requestCode == MY_DATA_CHECK_CODE) {
        if (resultCode == TextToSpeech.Engine.CHECK_VOICE_DATA_PASS) {
            myTTS = new TextToSpeech(this, this);
        }
        else {
            Intent installTTSIntent = new Intent();
            installTTSIntent.setAction(TextToSpeech.Engine.ACTION_INSTALL_TTS_DATA);
            startActivity(installTTSIntent);
        }
        }
}
When the data checking Intent completes, the app calls this method, passing it the “MY_DATA_CHECK_CODE” variable indicating whether or not the user has the TTS data installed. If the data is present, the code goes ahead and creates an instance of the TTS class. If the data is not present, the app will prompt the user to install it.

Step 9: Provide the onInit Method

Your class declaration is implementing “OnInitListener” so you must provide an “onInit” method. In this method, you can carry out any final set-up checks you need, as well as choosing settings for your TTS instance, such as language and locale options. Add the following import statement at the top of your class:
1
import java.util.Locale;
Add the “onInit” method to the class as follows:
1
2
3
4
5
public void onInit(int initStatus) {
    if (initStatus == TextToSpeech.SUCCESS) {
        myTTS.setLanguage(Locale.US);
    }
}
This code checks that the TTS resource is successfully instantiated, then sets a US English Locale for the speech operations. You can optionally output an error message for users if the TTS does not successfully instantiate by adding the following after the “if” block:
1
2
3
else if (initStatus == TextToSpeech.ERROR) {
    Toast.makeText(this, "Sorry! Text To Speech failed...", Toast.LENGTH_LONG).show();
}
If you use this code you will also need to import the Toast class by adding the following statement at the top of your file:
1
import android.widget.Toast;
Your app can carry out checks on the user device, such as available languages, as in the following extended version of the statement creating the TTS object inside the first conditional statement:
1
if(myTTS.isLanguageAvailable(Locale.US)==TextToSpeech.LANG_AVAILABLE) myTTS.setLanguage(Locale.US);

Step 10: Speak!

Finally, your app is ready to speak. Inside the “speakWords” method, add the following code:
1
myTTS.speak(speech, TextToSpeech.QUEUE_FLUSH, null);
There are lots of options here in terms of how your app handles speech. This code instructs the app to speak the text string immediately. If you want to add consecutive speech operations, you can instruct the app to wait until any current speech operations finish by adding your new speech item to a queue, as follows:
1
myTTS.speak(speech, TextToSpeech.QUEUE_ADD, null);
Speaking User Text
Once your class is finished with the TTS, you can optionally shut it down as follows:
1
myTTS.shutdown();
Don’t include this line if you want your users to be able to make the app speak more than once.

Conclusion

To see how all of these elements fit together, here is the complete class declaration:
1
2
3
4
5
6
7
8
9
10
11
12
13
14
15
16
17
18
19
20
21
22
23
24
25
26
27
28
29
30
31
32
33
34
35
36
37
38
39
40
41
42
43
44
45
46
47
48
49
50
51
52
53
54
55
56
57
58
59
60
61
62
63
64
65
66
67
68
import android.app.Activity;
import android.os.Bundle;
import android.view.View.OnClickListener;
import android.widget.Button;
import android.view.View;
import android.widget.EditText;
import android.speech.tts.TextToSpeech;
import android.speech.tts.TextToSpeech.OnInitListener;
import android.content.Intent;
import java.util.Locale;
import android.widget.Toast;
public class SpeakingAndroid extends Activity implements OnClickListener, OnInitListener {
        //TTS object
    private TextToSpeech myTTS;
        //status check code
    private int MY_DATA_CHECK_CODE = 0;
        //create the Activity
    public void onCreate(Bundle savedInstanceState) {
        super.onCreate(savedInstanceState);
        setContentView(R.layout.main);
                //get a reference to the button element listed in the XML layout
            Button speakButton = (Button)findViewById(R.id.speak);
                //listen for clicks
            speakButton.setOnClickListener(this);
            //check for TTS data
            Intent checkTTSIntent = new Intent();
            checkTTSIntent.setAction(TextToSpeech.Engine.ACTION_CHECK_TTS_DATA);
            startActivityForResult(checkTTSIntent, MY_DATA_CHECK_CODE);
    }
        //respond to button clicks
    public void onClick(View v) {
            //get the text entered
            EditText enteredText = (EditText)findViewById(R.id.enter);
            String words = enteredText.getText().toString();
            speakWords(words);
    }
        //speak the user text
    private void speakWords(String speech) {
            //speak straight away
            myTTS.speak(speech, TextToSpeech.QUEUE_FLUSH, null);
    }
        //act on result of TTS data check
    protected void onActivityResult(int requestCode, int resultCode, Intent data) {
        if (requestCode == MY_DATA_CHECK_CODE) {
            if (resultCode == TextToSpeech.Engine.CHECK_VOICE_DATA_PASS) {
                //the user has the necessary data - create the TTS
            myTTS = new TextToSpeech(this, this);
            }
            else {
                    //no data - install it now
                Intent installTTSIntent = new Intent();
                installTTSIntent.setAction(TextToSpeech.Engine.ACTION_INSTALL_TTS_DATA);
                startActivity(installTTSIntent);
            }
        }
    }
        //setup TTS
    public void onInit(int initStatus) {
            //check for successful instantiation
        if (initStatus == TextToSpeech.SUCCESS) {
            if(myTTS.isLanguageAvailable(Locale.US)==TextToSpeech.LANG_AVAILABLE)
                myTTS.setLanguage(Locale.US);
        }
        else if (initStatus == TextToSpeech.ERROR) {
            Toast.makeText(this, "Sorry! Text To Speech failed...", Toast.LENGTH_LONG).show();
        }
    }
}
Remember to use your own class name and to indicate your application package at the top of the file. If you are using Eclipse, you should not need to add all of the import statements manually, as the IDE will insert some of them automatically. Run your app in the Android emulator and hear it in action.
This is a basic overview of implementing Text To Speech in your Android apps. The TTS resource provides a wide range of additional options you may want to explore depending on the nature of your apps. When calling the TextToSpeech object “speak” method for example, you can pass a HashMap object indicating the details of more complex playback options.
Read More

Android application for speech(voice) recognition

// siddhu vydyabhushana // 2 comments
The Android platform provides support for both speech recognition and speech synthesis. In this tutorial, we will create a simple Android app which allows the user to speak, attempts to recognize what they say, and then repeats what was recognized back to them using the Text To Speech engine.

Step 1: Start an Android Project

Create a new Android project in Eclipse. Alternatively, if you want to implement the speech recognition functionality in an existing app, open it instead. For this tutorial we have a minimum SDK version of 8, and you do not need to make any particular additions to your Manifest file, the default contents should suffice.

Step 2: Define the User Interface

Let’s start by defining the user interface. When the app launches, the user will be presented with a button. On pressing the button, the app will prompt them to speak, listening for their voice input. When the speech recognition utility processes the speech input, the app will present a list of suggested words to the user. As you’ll know if you’ve tried speech recognition as a user, the recognizer is not always accurate, so this list is essential. When the user selects an item from the list, the app will speak it back to them using the TTS engine. The TTS part of the application is optional, so you can omit it if you prefer.
The app is going to use a few text Strings as part of the interface, so define them by opening the “res/values/strings.xml” file and entering the following content:
1
2
3
4
5
6
<resources>
    <string name="intro">Press the button to speak!</string>
    <string name="app_name">SpeechRepeat</string>
    <string name="speech">Speak now!</string>
    <string name="word_intro">Suggested words&#8230;</string>
</resources>
Of course, you can alter the String content in any way you like.
Open your “res/layout/main.xml” file to create the main app layout. Switch to the XML editor if the graphical editor is displayed by default. Enter a Linear Layout as the main layout for the app’s launch Activity:
1
2
3
4
5
6
7
<LinearLayout xmlns:android="http://schemas.android.com/apk/res/android"
    android:layout_width="fill_parent"
    android:layout_height="fill_parent"
    android:orientation="vertical"
    android:background="#ff330066"
    android:paddingBottom="5dp" >
</LinearLayout>
The Linear Layout contains various style declarations including a background color. Inside the Linear Layout, first enter an informative Text View:
1
2
3
4
5
6
7
8
<TextView android:layout_width="fill_parent"
    android:layout_height="wrap_content"
    android:text="@string/intro"
    android:padding="5dp"
    android:textStyle="bold"
    android:textSize="16dp"
    android:gravity="center"
    android:textColor="#ffffff33" />
Notice that the Text View refers to one of the Strings we defined. It also sets various display properties which you can alter if you wish. After the Text View, add a button:
1
2
3
4
<Button android:id="@+id/speech_btn"
    android:layout_width="match_parent"
    android:layout_height="wrap_content"
    android:text="@string/speech" />
The user will press this button in order to speak. We give the button an ID so that we can identify it in the Java code and display one of the Strings we defined on it. After the button, add another informative Text View, which will precede the list of suggested words:
1
2
3
4
5
<TextView android:layout_width="fill_parent"
    android:layout_height="wrap_content"
    android:padding="5dp"
    android:text="@string/word_intro"
    android:textStyle="italic" />
Again, this Text View uses a String resource and contains style properties. The last item in our main.xml Linear Layout is the list of suggested words:
1
2
3
4
5
6
7
8
9
10
11
12
13
<ListView android:id="@+id/word_list"
    android:layout_width="fill_parent"
    android:layout_height="0dip"
    android:layout_weight="1"
    android:paddingLeft="10dp"
    android:paddingTop="3dp"
    android:paddingRight="10dp"
    android:paddingBottom="3dp"
    android:layout_marginLeft="20dp"
    android:layout_marginRight="20dp"
    android:layout_marginTop="5dp"
    android:layout_marginBottom="5dp"
    android:background="@drawable/words_bg" />
The List View will be populated with data when the app runs, so we give it an ID for identification in Java. The element also refers to a drawable resource, which you should add to each of the drawables folders in your app’s “res” directory, saving it as “words_bg.xml” and entering the following content:
1
2
3
4
5
6
7
8
9
10
11
12
    android:dither="true">
    <gradient
    android:startColor="#ff000000"
    android:endColor="#ff000000"
    android:centerColor="#00000000"
    android:angle="180" />
    <corners android:radius="10dp" />
    <stroke
    android:width="2dp"
    android:color="#66ffffff" />
</shape>
This is a simple shape drawable to display behind the List View. You can of course alter this and the List View style properties if you wish. The only remaining user interface item we need to define now is the layout for a single item within the list, each of which will display a word suggestion. Create a new file in “res/layout” named “word.xml”and then enter the following code:
1
2
3
4
5
6
7
8
    android:layout_width="fill_parent"
    android:layout_height="fill_parent"
    android:gravity="center"
    android:padding="5dp"
    android:textColor="#ffffffff"
    android:textSize="16dp" >
</TextView>
Each item in the list will be a simple Text View. That’s our interface design complete. This is how the app appears on initial launch:
Speak and Repeat Launch
Note: don’t worry about the lack of dithering, this is just how it looks in the DDMS screenshot. On the device itself, the gradient is perfectly smooth.

Step 3: Setup Speech Recognition

Now we can implement our Java code. Open your app’s main Activity and add the following import statements at the top:
1
2
3
4
5
6
7
8
9
10
11
12
13
14
15
16
17
18
19
20
21
import java.util.ArrayList;
import java.util.List;
import java.util.Locale;
import android.app.Activity;
import android.content.Intent;
import android.content.pm.PackageManager;
import android.content.pm.ResolveInfo;
import android.os.Bundle;
import android.speech.RecognizerIntent;
import android.speech.tts.TextToSpeech.OnInitListener;
import android.speech.tts.TextToSpeech;
import android.util.Log;
import android.view.View;
import android.view.View.OnClickListener;
import android.widget.AdapterView;
import android.widget.AdapterView.OnItemClickListener;
import android.widget.ArrayAdapter;
import android.widget.Button;
import android.widget.ListView;
import android.widget.Toast;
import android.widget.TextView;
You may not need all of these if you do not implement the TTS functionality – Eclipse should highlight imports you have not used so check them when you finish coding. Extend your opening class declaration line as follows, altering the Activity name to suit your own:
1
public class SpeechRepeatActivity extends Activity implements OnClickListener, OnInitListener {
The “OnInitListener” is only required for the TTS function. Add the following instance variables inside your class declaration, before the “onCreate” method:
1
2
3
4
5
6
7
8
9
10
11
12
//voice recognition and general variables
//variable for checking Voice Recognition support on user device
private static final int VR_REQUEST = 999;
//ListView for displaying suggested words
private ListView wordList;
//Log tag for output information
private final String LOG_TAG = "SpeechRepeatActivity";//***enter your own tag here***
//TTS variables
//variable for checking TTS engine data on user device
private int MY_DATA_CHECK_CODE = 0;
//Text To Speech instance
private TextToSpeech repeatTTS;
Inside your “onCreate” method, your class should already be calling the superclass method and setting your main layout. If not, it should begin like this:
1
2
3
4
//call superclass
super.onCreate(savedInstanceState);
//set content view
setContentView(R.layout.main);
Next, still inside your “onCreate” method, retrieve a reference to the speech button and list we created, using their ID values:
1
2
3
4
//gain reference to speak button
Button speechBtn = (Button) findViewById(R.id.speech_btn);
//gain reference to word list
wordList = (ListView) findViewById(R.id.word_list);
The List View is an instance variable, accessible throughout the class. Now we need to find out whether the user device has speech recognition support:
1
2
3
4
5
6
7
8
9
10
11
12
13
//find out whether speech recognition is supported
PackageManager packManager = getPackageManager();
List<ResolveInfo> intActivities = packManager.queryIntentActivities(new Intent(RecognizerIntent.ACTION_RECOGNIZE_SPEECH), 0);
if (intActivities.size() != 0) {
    //speech recognition is supported - detect user button clicks
    speechBtn.setOnClickListener(this);
}
else
{
    //speech recognition not supported, disable button and output message
    speechBtn.setEnabled(false);
    Toast.makeText(this, "Oops - Speech recognition not supported!", Toast.LENGTH_LONG).show();
}
We query the environment to see if the Recognizer Intent is present. If it is, we instruct the app to listen for the user pressing the speech button. If speech recognition is not supported, we simply disable the button and output an informative message to the user.

Step 4: Listen for Speech Input

Let’s setup the click listener for the speech button we’ve instructed the app to detect clicks for. Outside the “onCreate” method, but inside your Activity class declaration, add an “onClick” method as follows:
1
2
3
4
5
6
7
8
9
/**
 * Called when the user presses the speak button
 */
public void onClick(View v) {
    if (v.getId() == R.id.speech_btn) {
        //listen for results
        listenToSpeech();
    }
}
Now implement the method we’ve called here after the “onClick” method:
1
2
3
4
5
6
7
8
9
10
11
12
13
14
15
16
17
/**
 * Instruct the app to listen for user speech input
 */
private void listenToSpeech() {
    //start the speech recognition intent passing required data
    Intent listenIntent = new Intent(RecognizerIntent.ACTION_RECOGNIZE_SPEECH);
    //indicate package
    listenIntent.putExtra(RecognizerIntent.EXTRA_CALLING_PACKAGE, getClass().getPackage().getName());
    //message to display while listening
    listenIntent.putExtra(RecognizerIntent.EXTRA_PROMPT, "Say a word!");
    //set speech model
    listenIntent.putExtra(RecognizerIntent.EXTRA_LANGUAGE_MODEL, RecognizerIntent.LANGUAGE_MODEL_FREE_FORM);
    //specify number of results to retrieve
    listenIntent.putExtra(RecognizerIntent.EXTRA_MAX_RESULTS, 10);
    //start listening
    startActivityForResult(listenIntent, VR_REQUEST);
}
Some of this code is standard for setting up the speech recognition listening functionality. Areas to pay particular attention to include the line in which we specify the “EXTRA_PROMPT” – you can alter this to include text you want to appear for prompting the user to speak. Also notice the “EXTRA_MAX_RESULTS” line, in which we specify how many suggestions we want the recognizer to return when the user speaks. Since we are calling the “startActivityForResult” method, we will handle the recognizer results in the “onActivityResult” method.
When the app is listening for user speech, it will appear as follows:
Speak and Repeat Listening

Step 5: Present Word Suggestions

Implement the “onActivityResult” method inside your class declaration as follows:
1
2
3
4
5
6
7
8
9
10
11
12
13
14
15
16
17
18
19
/**
 * onActivityResults handles:
 *  - retrieving results of speech recognition listening
 *  - retrieving result of TTS data check
 */
@Override
protected void onActivityResult(int requestCode, int resultCode, Intent data) {
    //check speech recognition result
    if (requestCode == VR_REQUEST && resultCode == RESULT_OK)
    {
        //store the returned word list as an ArrayList
        ArrayList<String> suggestedWords = data.getStringArrayListExtra(RecognizerIntent.EXTRA_RESULTS);
        //set the retrieved list to display in the ListView using an ArrayAdapter
        wordList.setAdapter(new ArrayAdapter<String> (this, R.layout.word, suggestedWords));
    }
    //tss code here
    //call superclass method
    super.onActivityResult(requestCode, resultCode, data);
}
Here we retrieve the result of the speech recognition process. Notice that the “if” statement checks to see if the request code is the variable we passed when calling “startActivityForResult”, in which case we know this method is being called as a result of the listening Intent. The recognizer returns the list of 10 suggested words, which we store as an Array List. We then populate the List View with these words, by setting an Array Adapter object as Adapter for the View. Now each of the items in the List View will display one of the suggested words.
If the app successfully recognizes the user input speech and returns the list of words, it will appear as follows:
Speak and Repeat Word List
Alternatively, if the app does not recognize the user speech input, the following screen will appear:
Speak and Repeat Failed to Recognize

Step 6: Detect User Word Choices

We want to detect the user selecting words from the list, so let’s implement a click listener for the list items. Back in your “onCreate” method, after the existing code, set the listener for each item in the list as follows:
1
2
3
4
5
6
7
8
9
10
11
12
13
14
15
//detect user clicks of suggested words
wordList.setOnItemClickListener(new OnItemClickListener() {
    //click listener for items within list
    public void onItemClick(AdapterView<?> parent, View view, int position, long id)
    {
        //cast the view
        TextView wordView = (TextView)view;
        //retrieve the chosen word
        String wordChosen = (String) wordView.getText();
        //output for debugging
        Log.v(LOG_TAG, "chosen: "+wordChosen);
        //output Toast message
        Toast.makeText(SpeechRepeatActivity.this, "You said: "+wordChosen, Toast.LENGTH_SHORT).show();//**alter for your Activity name***
    }
});
We use the “setOnItemClickListener” method to assign a listener to each item in the list. Inside the new “OnItemClickListener”, we implement the “onItemClick” method to respond to these clicks – this method will fire when the user selects a suggested word from the list. First, we cast the View that has been clicked to a Text View, then we retrieve the text from it. This text is the word the user has selected. We write the chosen word out to the Log for testing and output it back to the user as a Toast message. Depending on the needs of your own application, you may wish to carry out further processing on the chosen word – this code is purely for demonstration.
The user can press the touchscreen or use a trackball to select words in the list.
Speak and Repeat Selecting Words
When the user selects a word, the Toast message appears confirming it.
Speak and Repeat Toast Message

Step 7: Setup TTS Functionality

If you do not want to implement the Text To Speech functionality, you can stop now and test your app. We only require a little more processing to make our app repeat the user’s chosen word. First, to set up the TTS engine, add the following code to the section in your “onCreate” method where you queried the system for speech recognition support. Inside the “if” statement, after “speechBtn.setOnClickListener(this);”:
1
2
3
4
5
6
//prepare the TTS to repeat chosen words
Intent checkTTSIntent = new Intent();
//check TTS data
checkTTSIntent.setAction(TextToSpeech.Engine.ACTION_CHECK_TTS_DATA);
//start the checking Intent - will retrieve result in onActivityResult
startActivityForResult(checkTTSIntent, MY_DATA_CHECK_CODE);
Like the speech listening process, we will receive the result of this code checking for TTS data in the “onActivityResult” method. In that method, before the line in which we call the superclass “onActivityResult” method, add the following:
1
2
3
4
5
6
7
8
9
10
11
12
13
14
15
//returned from TTS data check
if (requestCode == MY_DATA_CHECK_CODE)
{
    //we have the data - create a TTS instance
    if (resultCode == TextToSpeech.Engine.CHECK_VOICE_DATA_PASS)
        repeatTTS = new TextToSpeech(this, this);
    //data not installed, prompt the user to install it
    else
    {
        //intent will take user to TTS download page in Google Play
        Intent installTTSIntent = new Intent();
        installTTSIntent.setAction(TextToSpeech.Engine.ACTION_INSTALL_TTS_DATA);
        startActivity(installTTSIntent);
    }
}
Here we initialize the TTS if the data is already installed, otherwise we prompt the user to install it. For additional guidance on using the TTS engine, see the Android SDK: Using the Text to Speech Engine tutorial.
To complete TTS setup, add the “onInit” method to your class declaration, handling initialization of the TTS as follows:
1
2
3
4
5
6
7
8
/**
 * onInit fires when TTS initializes
 */
public void onInit(int initStatus) {
    //if successful, set locale
    if (initStatus == TextToSpeech.SUCCESS)
        repeatTTS.setLanguage(Locale.UK);//***choose your own locale here***
}
Here we simply set the Locale for the TTS, but you can carry out other setup tasks if you like.

Step 8: Repeat the User Choice

Finally, we can repeat the user’s chosen word. Back in your “onCreate” method, inside the “OnItemClickListener” “onItemClick” method, after the line in which we output a Toast message, add the following:
1
2
//speak the word using the TTS
repeatTTS.speak("You said: "+wordChosen, TextToSpeech.QUEUE_FLUSH, null);
This will cause the app to repeat the user’s chosen word as part of a simple phrase. This will occur at the same time the Toast message appears.

Conclusion

That’s our complete Speak and Repeat app. Test it on an Android device with speech recognition and TTS support – the emulator does not support speech recognition so you need to test this functionality on an actual device. The source code is attached, so you can check if you have everything in the right place. Of course, your own apps may implement speech recognition as part of other processing, but this tutorial should have equipped you with the essentials of supporting speech input.
Read More